If it’s that house painting time of the year again.
The dreaded time to get the outside of the house cleaned and smartened up, but there are a few things you really need to know, so we put together some of our best top tips and decorating advice for you.
Whether you’ve done it before, or want to paint for the first time, these important tricks and tips will help you achieve a good finish, and do it safely too.
Painting the house is NOT an easy job and in many cases, we would recommend calling a decorator or wall coating specialist, but if you fancy having a go yourself, here’s a few hints from house painting guru Guy Alexander Bell, to make this years painting project that little bit easier!
The following tips are related to painting the OUTSIDE of the house, not the inside, although there are probably one or two of my tips that are relevant to both activities.
Plus we also take a look at the potential RISKS involved in taking on a large home improvement project like painting your own house. Further down the page there are some scary statistics on accidents whilst doing DIY.
Whilst we are best known for our wall coatings we don’t mind imparting a little knowledge to the keen DIY’er.
If you are on this page asking “should I paint my house?” then I would suggest you read on…
Remember that maintaining the character of your house will be something that you should consider before you start the project and if your home is listed or in a conservation area, they may be certain restrictions on what colour you can use.
Anyway, here we go, our top ten tips to get the outside of your house painted.
1. Plan the work in advance of exterior painting!
This may seem extremely obvious to everyone but you would be surprised how many people fail to plan to paint their house exterior, and then of course plan to fail, so write down what you are going to do, it helps you FOCUS!
You don’t have to sit down and write an award-winning essay, just some rough notes on one side of A4 paper will be sufficient.
Note any repairs or flaking paint you need to look at, make a list of stuff you will need (Don’t forget to buy the paint itself!), and maybe also work out how much you plan to spend on this
2. Get ready to paint!
Another thing people don’t seem to do is to prepare THEMSELVES for the work ahead.
Painting a house is NOT the same as sat down in front of the telly with a cuppa, it takes hard work and if you don’t make the effort, it will either not get done, or will look awful.
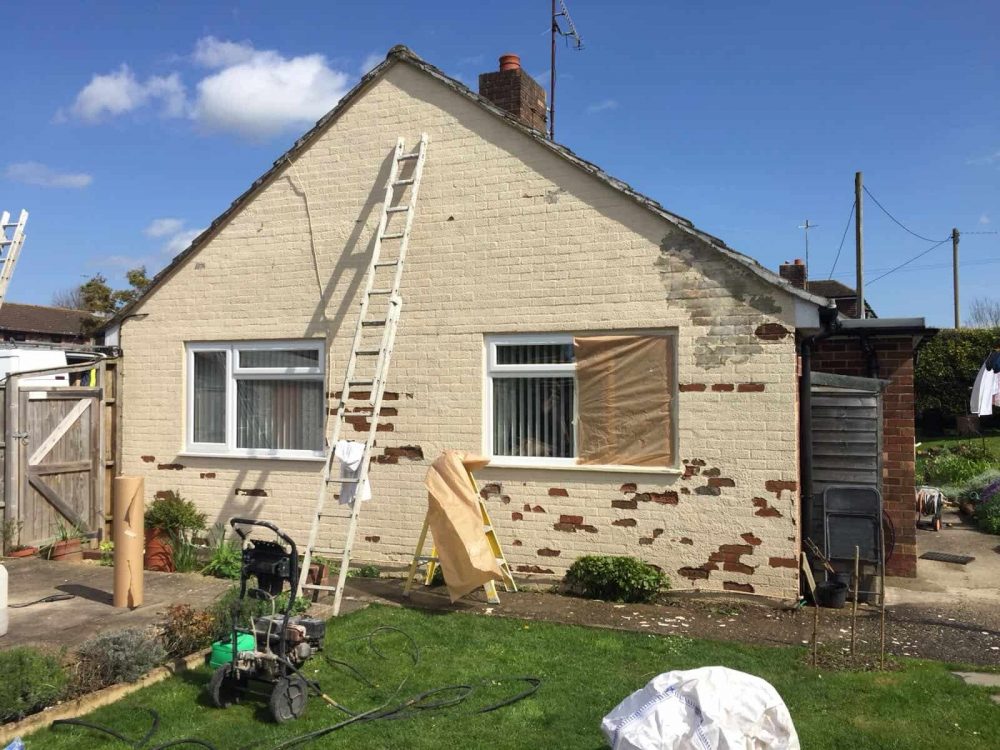
The painter in the image above has prepared themselves and knows the importance of scraping down old paint and also covering the floor.
It is not just the exterior painting that requires preparation, YOU DO TOO.
Make sure you have enough dust sheets or old blankets to use, so you don’t end up painting the patio and your lawn too.
Make sure you are physically prepared and able to carry out this work as it does require stamina, and if you are not used to climbing ladders, familiarise yourself with safe use.
Or get someone else to do it!
Make sure also you wear overall or old clothes as many exterior paints and wall coatings, especially waterproof ones, or damp proof paints, will NOT wash out of your clothes.
3. Get the materials needed to paint.
Time and time again we hear of people starting their decorating in earnest, only to find that in the middle of painting an elevation, an entire wall like the gable end, they run out of paint!
Ok, another trip to the DIY store yes?
Meanwhile that wall you half-painted is now drying, so when you get back, and carry on, once the whole wall is finished, you will see a shadow or a rough line where the 2 different cans of paint were used. DOH!
PRO EXPERT SECRET: The only way you can be sure, if you are not sure about how much paint to buy, is, after you shaken all of the cans of paint (with the lid firmly on!), AND THEN pour each one of them into a brand new large tub with a sealable lid and then mix them all together.
Then just dispense the paint you need from the larger container.
This also saves wastage and that means IT SAVES YOU MONEY!!!!!
That way, you won’t get brush lines, or shadows in your repainting as this can happen quite often, especially with darker coloured paints.
This is also true with paint BATCHES, and you will find a batch code on the side of each tin of paint. Remember to buy tins with the SAME batch code, especially with darker colours.
As a rough guide, these are the sort of things you will need to paint a house exterior.
- Some paint (!). Choose the best masonry paint you can afford.
- Brushes and rollers of various sizes.
- Dustsheets, tarpaulins or old bed sheets.
- Paint thinners, brush cleaner and turps (Handle with care)
- Scrapers, wire brush and assorted hand tools
- Sweeping brushes etc for keeping the area clean.
- Gloves, hat and any protective items.
- Masking tape and possible masking paper too.
- Old clothes and rags for cloths.
- Sandpaper, putty (if applicable) and filler.
- Step ladder, ladders and access equipment. (see below)
Oh, and……Make sure you have all ladders, tools, brushes that you need BEFORE YOU START!
This should be more or less all you will need however bear in mind, we are talking about PAINTING a house here and not preparing a house or repairing it.
TOP TIP: Do NOT buy cheap brushes to save money as they generally shed their bristles which can ruin your paint job and take twice as long as with a good quality decorators brush, SO YOU WILL END UP WASTING MONEY!
4. Clean the walls of the house before painting the walls.
Over time your house, especially if located next to a road, will pick up dirt, dust and grime, in addition to plant pollen, sap and leaf mould.
You should NOT paint over this, even with just primer, because paint won’t cure it, won’t clean it, and also paint, once finished, will look terrible if you have painted over dirt.
If you clean the walls beforehand, and allow to dry, your overall paint finish will be much better.
That sort of dirt build up is usually easy to spot, however for the best painting job, you need to CLEAN the exterior of your house.
This will get rid of any loose or friable material on the wall.
If your walls show signs of mould and green growth, they may be hiding a damp problem within the walls, so if you are not sure, get someone experienced to look at it BEFORE you apply the paint.
Remember, painting a house will NOT cure damp so do not kid yourself it will.
This also applies to the condition of the surface itself. If the wall to paint has cracks, this could be a sign that your wall needs re-rendering, and this is recommended before any painting is done.
If the house has a lot of grime then use a power washer, but only the type that is used to clean your car or driveway with.
5. Spray the paint instead of brushing, its much faster.
OK, this is the sort of thing we do every day, but if you have not done this before, and are only using masonry paint, you CAN spray it for a much quicker job, but there’s a few things you need to know before hand.
To avoid the spray going where you don’t want it to go, you must mask up areas that you do not want the paint to go to.

Remember when you spray paint, you create a fine mist, which with the slightest gust of wind, or with the sprayers inexperience, that fine mist can cover not only your windows, but your car too, and your wife’s prized rose bush!!!
PRO EXPERT SECRET: If you see in the photo we also laid dust sheets down, and then paper up to the damp course on the ground.
Why? Because not only will this tip **** save you about two days of cleaning up **** afterwards, its just professional, simple as that. If you want to paint like a pro, ACT like a pro!
6. Tips for preparing the exterior wall for paint.
Quite simply, the majority of any house painting job is the preparation beforehand. ONE DAY that you spend on preparation, will save you at least THREE DAYS of work and cleaning up afterwards.
The exterior wall needs to be READY for the paint, so you need to look at any cracks that need filling, perhaps old render that has come away from the wall and is hollow, and remove mould, dirt and grime from the walls.
Sand down any rough bits on the walls and woodwork and fill in any holes, bumps and cracks.
f you take time in preparing, and you don’t have to be a professional decorator, you will SAVE time and MONEY when you paint.
Painting the exterior of your house yourself is NOT easy and is fraught with danger.
Every year, and not just here in the UK, thousands of people get killed, or at best, injure themselves by falling from roofs, scaffolding and ladders.
It’s so easy if you are not used to paint a house, to stand back to admire your work, forgetting that you are on a ladder 3 stories up…
Painting the outside of a house from a ladder, especially a tall house is often not a good idea for the novice painter so look through the yellow pages for a reputable scaffolding company.
You would ideally find one with trade accreditation and one who can show you their accident book (a legal requirement) and also proof of insurance.
Starting the painting.
OK, first off, now you are ready, and prepared, I mean mentally, not just prepared as in “I just spent a load of money down at the DIY shop” and you are ready to start painting.
You should have already chosen the colour, and agreed with the other half that this is the right way to go about it (!) and have moved away items that clutter around the house as remember this is now a WORK AREA and must be treated as such.
Make sure that all preparation is done
Preparation, as we spoke about earlier in the text, is essential if your paint job is to last for more than a few months.
Flaking paint needs to be taken off, hollow rendering needs to be sorted, rotten wood needs replacing, missing window putty needs to be done, and any mould or algae needs to be taken off too.
If by this stage you don’t feel confident, this is telling you to get a man in instead!
It could actually save you money as a proper decorator will be able to the job in a few days that would take you several weeks.
Once you are confident that all is well, you should start at the TOP of the house and work down (NOT the other way around), preferably using scaffolding.
7. Tips to achieve the best exterior wall finish
Another great time-saving tip is to do with the finishing off of the job AFTER you have painted the walls. When you paint a house, that is a large surface area, but what about attention to detail?
The pro painter will spend a lot of time on details, such as cutting in to corners and alcoves where the roller didn’t reach, or making sure the paint has gone under the window cills, and right down to the DPC.
This will give nice, neat and straight lines down each opening, for a real pro finish every time.
One tip is to put a masking tape line around the window reveals, and make sure the tape encroaches onto the window frame by a few mm only.
Then paint onto the tape carefully, making sure you don’t lift the tape or get paint under it.
As soon as you have finished one line or section, carefully remove the tape, standing away from the window and pulling outwards. Dispose of the tape in a bag or you may find that scrunched up ball of tape you chucked on the floor will blow around and put paint splashes on the floor.
There does exist a special painters tape, available from your local DIY store, which is much better for this sort of thing, but more expensive than masking tape.
TOP TIP: For a real pro finish, do NOT buy DIY paint, go to your local trade store and buy the trade equivalent paint. This is much better quality than DIY paint and will last longer, something the paint companies fail to tell the public.
Animals must be kept well away from any work you do, as the last thing “Rover” the Labrador wants when he is playing in the garden is his head to get covered in paint, or for him to think drinking your brush thinners seems like a good idea.

It’s the same with kids. You MUST tell them in no uncertain terms not to go near the paint or the area you are painting.
Test your paint, or even your skills, on an obscure area at ground level, on a very small area to start with. Make sure the surface you are painting on is “sound” and of good quality, and your paint is well mixed, and your brush does not shed bristles.
8. Paint the outside when its cloudy if possible, it’s much easier.
Many DIY painters wrongly think the best time to paint your house is mid summer because of the low chance of rain.
The best sort of weather to paint is not too cold and not too warm and without the sun.
This is because when you paint a wall on a sunny day, the sun will shine on the wall and I guarantee that the glare or reflection will affect your eyes, and people who do this every day end up with eye strain.
Paint when it is cloudy and try and finish mid afternoon if possible.
If using gloss paint or emulsion, wait until you are confident there is no chance of rain because the painted wall could end up suffering from a term not widely known in DIY circles and that is Surfactant leaching.
This is when ingredients contained in the paint becoming affected by moisture which then brings components of the paint to the surface, drying in a waxy film.
Do not get your paint straight from the tin you bought it in, use a light metal bucket known as a paint kettle and of course for rollers, use the special tray or elongated buckets (troughs) designed to work with rollers.
You can buy a paint kettle for at little as £1.50 (Toolstation) and for applying paint with a roller, you need a paint SCUTTLE, which can be bought for around £3.50 from Wilco.com
Some also have handy hooks to keep in place on the scaffold.
Place the lid back on the tin when you are not getting paint out of it.
Starting at the top, and using a roller, make confident strokes with a roller that has a good coating of paint but not too much so it drips.
Work the paint in well, not missing any bits, but remember most house paint jobs need 2 coats of paint, so pay attention as you will be doing all of this twice.
Cut into edges and around doors and windows with a smaller brush.
9. “bolt-on” something else to finish the job off!
What I mean is, if you are working outside, you may have noticed other things that need to get done too, such as a cracked window pane, missing gutter clips or a blocked gutter, maybe the garden looks scruffy?
With a nicely painted house, you need to finish the job off, and it’s nothing to do with more paint!
Get any other problem areas fixed, or it just ruins all the effort you put into painting the walls, the siding, the trim and any other area outside the home.
Tidy the garden, or at least the area nearest to the house.
This will finish it off nicely, sort of like putting a frame around a painting that you have bought from the shop. If you are doing some painting for someone else, this can also earn you brownie points and maybe even a nice tip at the end.
10. Start at the top, and work down, for a great finish.
The final tip I will give you today is to start your painting at the top of the house, not the bottom.
This at first seems obvious but with the inexperienced painter may be lacking confidence they often start at the bottom and work up.
We know this as quite often the keen DIY painter will start the job, realise he or she can’t finish it and then they contact NEVER PAINT AGAIN to finish the work for them.
Why do you think that TOP decorators are known by that very moniker? TOP!
You must always start at the top, yes on the ladder or the scaffolding, and work downwards, even if only to be able to have the opportunity to paint over those splashes from your brush or roller whilst painting the top floor exterior?
There is a method and a correct way to do almost everything in life, and, provided you take heed to this collection of pretty simple tips, and use the method correctly to paint your house, you shouldn’t have any problems.
And the final take away….
SAFETY whilst painting and decorating is also of primary importance.
Do not take risks and do not use tools or chemicals that you are unfamiliar with.
Do not under estimate how major a task painting the house can be.
It is important also that I tell you that if you are not confident, and I don’t mean super confident as we all have our fears and worries if we are doing something that we are not used to doing, but if you are absolutely scared stuff of this then do yourself a favour and hire someone else to paint the house!
Painting the outside does at least require some forethought and planning but if you get it right, you can look forward to a nice looking house….for now anyway.
Painters and decorators have to go through a certain training period before they are let loose on houses and business premises, so bear that in mind when you start and don’t attempt to paint your house if you really don’t have a clue or lack confidence as it is not easy.
IMPORTANT SAFETY ADVICE IF YOU ARE CONSIDERING PAINTING YOUR OWN HOUSE.
In 2010, ROSPA published the following set of statistics for DIY related accidents:
Injuries from tools and machinery are estimated to account for 87,000 of the 220,000 DIY enthusiasts turning up at hospital each year
Ladder and stepladder accidents send 41,000 people to hospital annually – often resulting in some of the most serious injuries and even death when people fall from high up.
Splinters, grit, dust, dirt and other particles result in another 60,000 people seeking treatment in casualty
The most dangerous tools according to the Home Accident Surveillance System (2002) are:
1. Knives and scalpels (21,300 accidents in the UK each year)
2. Saws (15,100)
3. Grinders (6,400)
4. Hammers (5,800)
5. Chisels (3,900)
6. Screwdrivers (3,400)
7. Power Drills (3,000)
8. Axes (2,200)
9. Planes (2,100)
10. Welding Equipment (2,000).
The top ten DIY materials to take care with are:
1. Wood, chipboard etc. (29,400 accidents)
2. Paving/Concrete Blocks (21,200)
3. Metal bars, sheets etc. (12,800)
4. Nails (15,400)
5. Bricks (8,000)
6. Paint and paint pots (3,900)
7. Glue, paste etc. (3,100)
8. Screws and floor/wall tiles (2,500)
10. Wallpaper (1,600).
Common DIY accidents include cuts from knives while cutting cable and carpets, slips with saws when cutting wood, paint dripping into eyes from ceilings and slabs falling onto hands and feet
People often make mistakes when they rush jobs or are tired.
Many people overestimate their capabilities, for instance gas and electric work should be left to the experts, and the same goes for decorating.
www.rospa.com
Wise words indeed.
Some times, deciding to save a few quid by doing house painting yourself can seriously backfire on you.
Safe Professional exterior Painting and Decorating
Most Painters and Decorators now have a lot more things to think about when it comes to the job they do.
In previous years, a painter and decorator would just turn up and paint what the customer wanted and that was about it and some didn’t even clean up afterwards!
Nowadays there is a lot more work that goes into the job than just the painting.
Many of the traditional painters and decorators sometimes specialise in other areas of the decorating business, such as painting very tall buildings, applying hygienic coatings inside hospitals, or painting in remote areas such as the North York Moors, Dartmoor or a Scottish island.
Once you have painted one floor of the house, move down to the lower level of scaffold and start painting that elevation, again, cutting in around windows.
If a slight breeze is in the air, you may want to temporarily put masking over the windows to avoid a fine paint spray or drips on the glass panes.
Finally, back to the easiest bit to paint: ground level!
It’s always best to save the best until last and this should be the easier bit.
Again, make sure that no one is around the house where you are painting and make sure you put “WET PAINT!” signs everywhere, just to make it crystal clear. Ensure you haven’t missed any bits such as window reveals or behind pipe
What to do after you have finished decorating.
Anyway, you need to remove any masking paper you put up, if applicable, making sure it doesn’t touch the walls when you remove it, and then put it in a bin liner for recycling.
In most cases, and depending on temperature and your local climate, the paint should be dry the next day but make sure you do not put anything up against for a while it as it will scar the paintwork.
Clean your brushes and roller with a special brush cleaner you can get from most DIY stores and then store them away for another day.
We would suggest “DIALL” brush cleaner from B and Q £9.97 for 2 litres, will last you for ages.
If all of the above sounds a bit too much, contact us to paint your house instead!
Just a quick heads-up , if you have surfed onto this page looking for a company to actually PAINT your house, rather than just here getting information, no problem, if you contact us we can tell you how much it would cost to paint your house.
If you do NOT want to paint your own house and would like a quote for us to do it, please be sure to call us, on 0800 970 4928