
One aspect of our work that defines us apart from your local painter and decorator is the fact we also do rendering, alteration and repairs to render as well as painting houses.
We have to be very clued-up about the use of mortar and all it’s permutations, so we thought today we would share some of that knowledge with yourselves.
So here’s all about mortar; it’s uses, health and safety, tools and applications.
Mortar can generally be thought of a like a glue that fills gaps (!) which will even out uneven and irregular wall surfaces, bind blocks and bricks together in the construction of a wall, and also as rendering (USA: Stucco) to achieve a smooth and weatherproof finish.
It enables structural loads to be evenly distributed to ensure a safe, solid and practical construction.
That all sounds easy-peasy but of course there is far more to it than that.
The different types of mortar explained
There are really TWO main types of mortar, which are CEMENT mortar (Sand and cement) and GAUGED mortar, which is often Sand, cement and lime, (although lime is sometimes substituted).
In general, the higher content of cement within the mix gives the mortar durability and strength, however add too much and the mortar will crack and shrink, and maybe also lose it’s ability to BOND with the wall surface.
Bear in mind that when we speak about mortar on this website, it is assumed that you realise WATER is also added to the mix (obviously), and it is this which assists the ingredients to bind together, plus the water will aid the curing process once applied to the wall.
The type of SAND that is used in the mortar mix is very important and what is known as BUILDER’S SAND, which is what you should use, and NOT what is known as sharp sand, which is used for concrete, or playpit sand, which is used…er….for children’s sand pits!
Adding lime to the mix enables the mortar to become work workable (easier to use and apply) and adding lime or a preparatory PLASTICISER (such as Geocel, £2.69 for 5 litres) will mean that your mortar mix is less likely to crack, potentially ruining the work you have put in so make sure you follow that point when using mortars.
Any plasticiser you use should conform to BS4887 so do NOT buy an old can of it for a quid at your local car boot sale please!
TIP: You may have heard of people using washing up liquid as a mortar plasticiser. NEVER EVER EVER do this.
For one, washing up liquid, by volume, is actually more expensive (!) than the real thing, plus your bottle of Fairy liquid would also contain salts, amongst other things, which after a couple of years will see the render or mortar joints degrade very quickly.
Some DIY and hardware stores will sell small pre-mixed bags of mortar but these should only ever be used for small jobs such as a patch repair or fixing a fence post etc.
What tools are needed to apply mortar?
- Shovel (spade)
- Trowel (the type of which depends on the work you plan to do)
- A spot-board (A flat, lipped board, made to mix mortar on.
- Buckets
- Brushes and brooms
- Safety equipment such as gloves and goggles
What mortar mixture is recommended for bricklaying?
There are generally 2 mixes that should be considered for mortar repair, re-pointing, or for rendering.
The standard mix, which would be used to create garden walls, for example, would be one part of cement, mixed with 5 parts of sand, with one part plasticiser, as mentioned above.
Each PART is referring to the PERCENTAGE of each part of the mix, rather like baking a simple recipe in the kitchen.
So in the above case we can imagine the “recipe” we are making to be consisted of SEVEN parts, and it is very important to get this balance right.
Too much water, the mixture is too runny and has to be thrown away, and no you cannot add more sand or cement to thicken it up, (like a cooking recipe) as once the mixture is too thin it will never get back to the right consistency, so start again!
It is worth noting that this is the mix for bricklaying, so what about rendering?

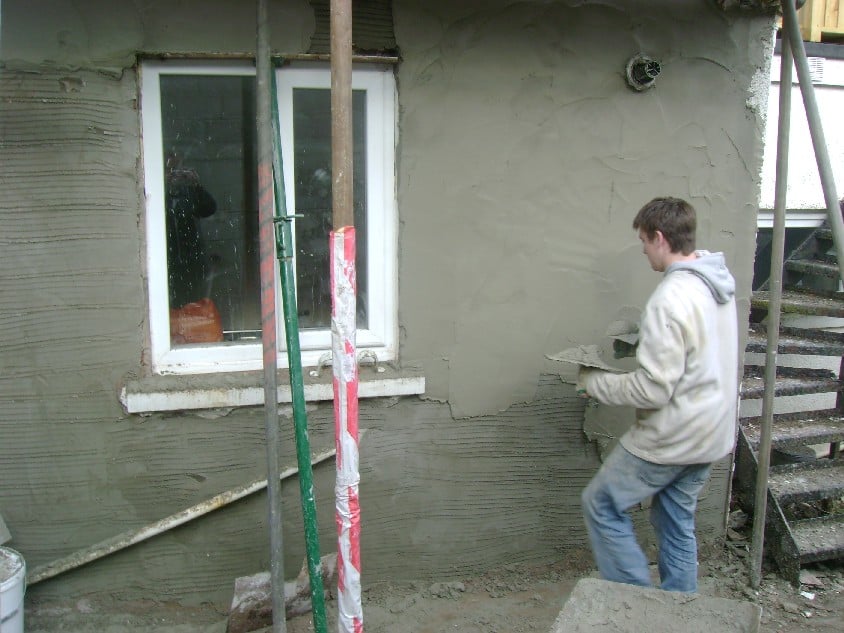
Applying render to a wall requires a different mix altogether, however before we start there is a page all about rendering here if you want to learn more about it, and it will open in another browser window so you won’t lose your place.
What mortar mix is the right mix for rendering?
The correct mix to use when applying rendering should be more or less ONE part of cement to FOUR parts of sand.
This mix can vary slightly, depending on the porosity of the wall and the material the wall is made from. Climatic conditions can also play a factor, for example rendering dries quicker during the summer time and will require slightly more water than if you were doing it in the winter.
Mixing mortar.
Now we have learn about the two main types of mixture, how does one go about actually mixing it up?
First and foremost, this should be done with great care.
Cement powder on naked skin can burn away at the skin, and worse still if it is on your hands and you rub your eyes, it’s really gonna hurt, so be careful and use the right tools and safety equipment.
We spoke earlier about the different PARTS, such as one part of (blah blah) so if you are unsure and you want to get it right, simply MEASURE your ingredients, once again making the example of baking a cake.
If you add too much flour or not enough eggs, your cake won’t work, and it is the same with mixing sand and cement.
If in doubt, take a few bucket and measure each “part” yourself, and then tip it out into your mixer or onto your spot board.
The sand you use should be slightly damp.
If you are mixing using a spot board (recommended) tip out all the measured ingredients onto the board and mix it up using a shovel.
Once it is all mixed up nicely, make a hole in the middle, so it looks like a volcano (!). You can tell I have an interesting imagination!
Then SLOWLY pour the water into the middle (not all at once) and start mixing it around until it becomes a paste. If using a cement mixer, make sure you know HOW to use one, what to do if there is a problem (e.g. know how to turn it off) and make sure kids and pets are kept well away.
If you actually want someone to carry out some rendering we can also help you.
Just go to the CONTACT PAGE HERE.
You can also call us on 0800 970 4928
I hope that you found this article useful and I would like to think you would do us a favour and SHARE it on your social networks. Thank you.
This content (C) Guy Alexander Bell Bsc.(hons).Pg.Dip., company surveyor.